> ## Documentation Index
> Fetch the complete documentation index at: https://mintlify.com/dgtlmoon/changedetection.io/llms.txt
> Use this file to discover all available pages before exploring further.
# Browser Steps
> Automate browser interactions before monitoring - click buttons, fill forms, and navigate pages
# Browser Steps
Browser Steps allow you to automate interactions with webpages before monitoring for changes. You can log in to websites, click buttons, fill out forms, accept cookie notices, and perform any sequence of actions needed to reach the content you want to monitor.
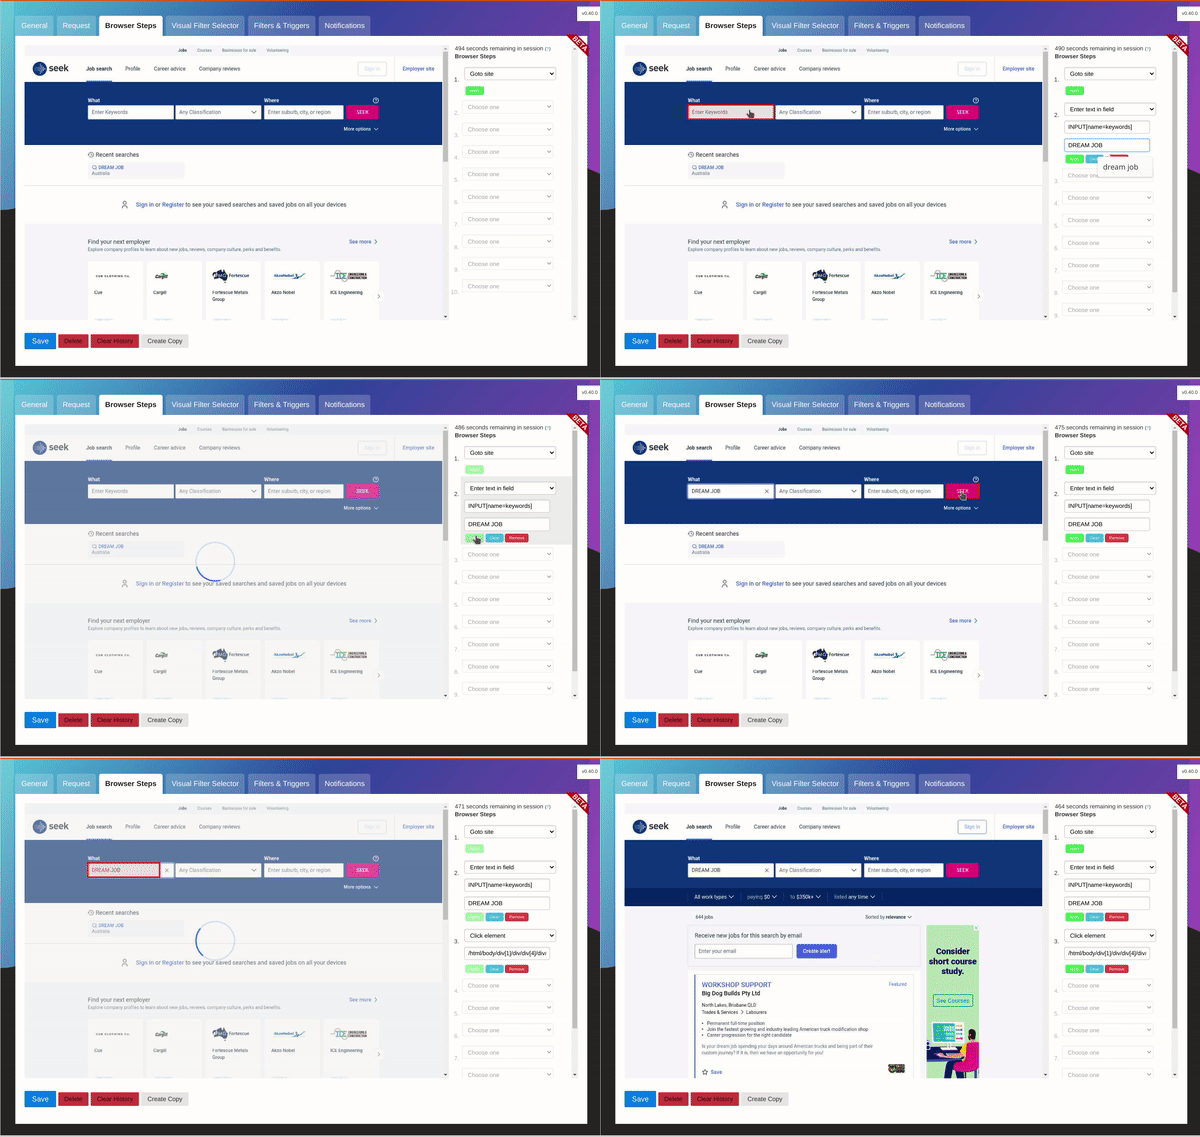 ## What are Browser Steps?
Browser Steps are automated actions that run before changedetection.io extracts content from a page. Think of them as a recorded sequence of clicks, typing, and navigation that prepares the page for monitoring.
**Browser Steps run before change detection**
The sequence is:
1. Browser Steps execute (login, click, navigate, etc.)
2. Page reaches the target state
3. Change detection extracts and compares content
4. Visual Selector or filters refine what's monitored
## Why Use Browser Steps?
Monitor content behind login screens or authentication
Click through menus, search forms, or multi-step processes
Dismiss cookie notices, modals, or overlay dialogs
Interact with JavaScript-heavy sites and single-page apps
## Prerequisites
Browser Steps require a browser-based fetcher:
**Playwright/Chrome Required**
Browser Steps only work with:
* Playwright (recommended)
* WebDriver/Chrome
The basic HTTP fetcher cannot execute Browser Steps.
## Available Browser Steps
Browser Steps provides a comprehensive set of actions:
### Navigation Actions
| Action | Description | Example |
| - | - | - |
| **Goto URL** | Navigate to a specific URL | Navigate to login page |
| **Goto site** | Return to the original watch URL | Reset to starting page |
### Click Actions
| Action | Description | Selector Required | Value Required |
| - | - | - | - |
| **Click element** | Click on an element (fails if not found) | ✅ CSS/XPath | ❌ |
| **Click element if exists** | Click only if element is present | ✅ CSS/XPath | ❌ |
| **Click element containing text** | Click element with specific text | ❌ | ✅ Text to find |
| **Click element containing text if exists** | Click text element only if present | ❌ | ✅ Text to find |
| **Click X,Y** | Click at specific coordinates | ❌ | ✅ "100,200" |
### Form Interactions
| Action | Description | Selector Required | Value Required |
| - | - | - | - |
| **Enter text in field** | Type into an input field | ✅ CSS/XPath | ✅ Text to enter |
| **Check checkbox** | Check a checkbox | ✅ CSS/XPath | ❌ |
| **Uncheck checkbox** | Uncheck a checkbox | ✅ CSS/XPath | ❌ |
| **Select by label** | Choose dropdown option by visible text | ✅ CSS/XPath | ✅ Option text |
### Wait Actions
| Action | Description | Value Required |
| - | - | - |
| **Wait for seconds** | Pause for specified duration | ✅ Number (e.g., "5") |
| **Wait for text** | Wait until text appears on page | ✅ Text to wait for |
| **Wait for text in element** | Wait for text in specific element | ✅ Both selector & text |
### Advanced Actions
| Action | Description | Selector Required | Value Required |
| - | - | - | - |
| **Execute JS** | Run custom JavaScript code | ❌ | ✅ JavaScript code |
| **Remove elements** | Delete elements from the DOM | ✅ CSS/XPath | ❌ |
| **Make all child elements visible** | Force visibility of hidden elements | ✅ CSS/XPath | ❌ |
| **Scroll down** | Scroll the page down | ❌ | ❌ |
| **Press Enter** | Press the Enter key | ❌ | ❌ |
## How to Use Browser Steps
### Step 1: Enable Browser Fetching
1. Edit your watch or create a new one
2. Set **Fetch Method** to **Chrome/Playwright**
3. Navigate to the **Browser Steps** section
### Step 2: Add Steps
Select an action from the **Operation** dropdown (e.g., "Click element", "Enter text in field")
Enter the CSS selector or XPath for the element
Example selectors:
* CSS: `#username`, `.login-button`, `input[name="email"]`
* XPath: `//button[@id='submit']`, `//input[@type='password']`
Provide the text, URL, or value required for the action
Examples:
* For "Enter text in field": your username or password
* For "Wait for seconds": "5"
* For "Click X,Y": "150,300"
Click the **+** button to add additional steps. Steps execute in order from top to bottom.
### Step 3: Test Your Steps
1. Click **Check now** to run your watch
2. Check the **Last check output** for errors
3. Use the screenshot (if enabled) to verify the final page state
4. Adjust steps as needed and test again
## Common Workflows
### Login to a Website
```
Step 1: Click element
Selector: #login-button
Step 2: Enter text in field
Selector: input[name="username"]
Value: your-username
Step 3: Enter text in field
Selector: input[name="password"]
Value: your-password
Step 4: Click element
Selector: button[type="submit"]
Step 5: Wait for seconds
Value: 3
```
### Accept Cookie Notice
```
Step 1: Wait for seconds
Value: 2
Step 2: Click element if exists
Selector: .cookie-accept-button
```
### Search and Monitor Results
```
Step 1: Enter text in field
Selector: input[name="search"]
Value: your search term
Step 2: Press Enter
Step 3: Wait for text
Value: Search results
Step 4: Click element containing text
Value: Filter
```
### Navigate Through Multi-Step Form
```
Step 1: Select by label
Selector: select[name="country"]
Value: United States
Step 2: Click element
Selector: button.next-step
Step 3: Wait for seconds
Value: 2
Step 4: Enter text in field
Selector: input#zipcode
Value: 12345
Step 5: Click element
Selector: button.show-results
```
## Best Practices
Websites need time to respond to interactions. Always add a small wait (1-2 seconds) after clicks or form submissions.
```
Step 1: Click element
Selector: .load-more-button
Step 2: Wait for seconds
Value: 2
```
Use unique IDs or specific classes to avoid clicking the wrong element.
**Good:** `#submit-button`, `button[data-test='login']`
**Bad:** `button`, `.btn` (too generic)
Use "if exists" variants for elements that might not always be present (like cookie notices).
```
Click element if exists
Selector: .cookie-banner button.accept
```
Enable screenshots in your watch settings to see the final page state after all steps execute.
Go to watch settings → Enable "Attach screenshot to notification"
Break complex workflows into clear, ordered steps. If something fails, it's easier to debug.
## Finding Selectors
### Using Browser DevTools
Right-click on the element → Select **Inspect** (or press F12)
The DevTools will highlight the HTML element
Right-click on the element in DevTools → Copy → Copy selector (CSS) or Copy XPath
Paste the selector into the Browser Steps field and test
### Selector Tips
**Prefer IDs over classes**
IDs are unique and more stable:
* `#username` ✅
* `.form-input` ❌ (might match multiple elements)
If no ID exists, use specific attributes:
* `input[name="email"]`
* `button[data-testid="submit"]`
## Troubleshooting
### Step Fails: Element Not Found
**Causes:**
* Element hasn't loaded yet
* Selector is incorrect
* Page structure changed
**Solutions:**
* Add a "Wait for seconds" step before the failing step
* Use "Wait for text" to ensure content has loaded
* Verify the selector using browser DevTools
* Use "if exists" variant if element is optional
### Login Doesn't Work
**Common issues:**
* Missing wait time after submitting credentials
* Website uses CAPTCHA or bot detection
* Incorrect selector for username/password fields
**Try:**
```
Step 1: Enter text in field (username)
Step 2: Enter text in field (password)
Step 3: Wait for seconds (Value: 1)
Step 4: Click element (submit button)
Step 5: Wait for seconds (Value: 5)
```
### Page Redirects Unexpectedly
**Solution:** Use "Wait for text" to ensure the target page has loaded:
```
Step 1: Click element (navigation link)
Step 2: Wait for text
Value: Expected text on target page
```
### JavaScript Not Executing
**Verify:**
* JavaScript is valid syntax
* You're using "Execute JS" action
* The script returns a value or modifies the page
**Example:**
```javascript theme={null}
document.querySelector('.hidden-content').style.display = 'block';
```
## Advanced Techniques
### Using Jinja2 Variables
Browser Steps support Jinja2 templating for dynamic values:
```
Enter text in field
Selector: input[name="date"]
Value: {{ now().strftime('%Y-%m-%d') }}
```
This enters today's date automatically.
### Combining with Visual Selector
**Recommended Workflow**
1. Use **Browser Steps** to navigate and interact with the page
2. Use **Visual Selector** to choose what content to monitor
3. Use **Filters** to refine change detection
Example:
```
1. Browser Steps: Log in and navigate to dashboard
2. Visual Selector: Select the "Account Balance" element
3. Filter: Trigger only when balance increases
```
### Executing Complex JavaScript
For advanced scenarios, use "Execute JS" to run custom code:
```javascript theme={null}
// Click all "Load more" buttons
document.querySelectorAll('.load-more').forEach(btn => btn.click());
// Scroll to bottom of infinite scroll
window.scrollTo(0, document.body.scrollHeight);
// Fill complex forms
document.querySelector('input[name="token"]').value = 'abc123';
```
## Security Considerations
**Storing Credentials**
Browser Steps are stored in plain text. Be cautious when entering passwords:
* Use a dedicated monitoring account with limited permissions
* Don't use your personal credentials
* Consider using environment variables or external credential management
* Regularly rotate passwords for monitoring accounts
## Related Features
Select specific page elements after Browser Steps complete
Refine what content triggers change notifications
## Next Steps
Set up a simple login or cookie acceptance flow
Use both features together for powerful monitoring
Configure alerts when monitored content changes
This documentation is built and hosted on [Mintlify](https://mintlify.com), a developer documentation platform.
## What are Browser Steps?
Browser Steps are automated actions that run before changedetection.io extracts content from a page. Think of them as a recorded sequence of clicks, typing, and navigation that prepares the page for monitoring.
**Browser Steps run before change detection**
The sequence is:
1. Browser Steps execute (login, click, navigate, etc.)
2. Page reaches the target state
3. Change detection extracts and compares content
4. Visual Selector or filters refine what's monitored
## Why Use Browser Steps?
Monitor content behind login screens or authentication
Click through menus, search forms, or multi-step processes
Dismiss cookie notices, modals, or overlay dialogs
Interact with JavaScript-heavy sites and single-page apps
## Prerequisites
Browser Steps require a browser-based fetcher:
**Playwright/Chrome Required**
Browser Steps only work with:
* Playwright (recommended)
* WebDriver/Chrome
The basic HTTP fetcher cannot execute Browser Steps.
## Available Browser Steps
Browser Steps provides a comprehensive set of actions:
### Navigation Actions
| Action | Description | Example |
| - | - | - |
| **Goto URL** | Navigate to a specific URL | Navigate to login page |
| **Goto site** | Return to the original watch URL | Reset to starting page |
### Click Actions
| Action | Description | Selector Required | Value Required |
| - | - | - | - |
| **Click element** | Click on an element (fails if not found) | ✅ CSS/XPath | ❌ |
| **Click element if exists** | Click only if element is present | ✅ CSS/XPath | ❌ |
| **Click element containing text** | Click element with specific text | ❌ | ✅ Text to find |
| **Click element containing text if exists** | Click text element only if present | ❌ | ✅ Text to find |
| **Click X,Y** | Click at specific coordinates | ❌ | ✅ "100,200" |
### Form Interactions
| Action | Description | Selector Required | Value Required |
| - | - | - | - |
| **Enter text in field** | Type into an input field | ✅ CSS/XPath | ✅ Text to enter |
| **Check checkbox** | Check a checkbox | ✅ CSS/XPath | ❌ |
| **Uncheck checkbox** | Uncheck a checkbox | ✅ CSS/XPath | ❌ |
| **Select by label** | Choose dropdown option by visible text | ✅ CSS/XPath | ✅ Option text |
### Wait Actions
| Action | Description | Value Required |
| - | - | - |
| **Wait for seconds** | Pause for specified duration | ✅ Number (e.g., "5") |
| **Wait for text** | Wait until text appears on page | ✅ Text to wait for |
| **Wait for text in element** | Wait for text in specific element | ✅ Both selector & text |
### Advanced Actions
| Action | Description | Selector Required | Value Required |
| - | - | - | - |
| **Execute JS** | Run custom JavaScript code | ❌ | ✅ JavaScript code |
| **Remove elements** | Delete elements from the DOM | ✅ CSS/XPath | ❌ |
| **Make all child elements visible** | Force visibility of hidden elements | ✅ CSS/XPath | ❌ |
| **Scroll down** | Scroll the page down | ❌ | ❌ |
| **Press Enter** | Press the Enter key | ❌ | ❌ |
## How to Use Browser Steps
### Step 1: Enable Browser Fetching
1. Edit your watch or create a new one
2. Set **Fetch Method** to **Chrome/Playwright**
3. Navigate to the **Browser Steps** section
### Step 2: Add Steps
Select an action from the **Operation** dropdown (e.g., "Click element", "Enter text in field")
Enter the CSS selector or XPath for the element
Example selectors:
* CSS: `#username`, `.login-button`, `input[name="email"]`
* XPath: `//button[@id='submit']`, `//input[@type='password']`
Provide the text, URL, or value required for the action
Examples:
* For "Enter text in field": your username or password
* For "Wait for seconds": "5"
* For "Click X,Y": "150,300"
Click the **+** button to add additional steps. Steps execute in order from top to bottom.
### Step 3: Test Your Steps
1. Click **Check now** to run your watch
2. Check the **Last check output** for errors
3. Use the screenshot (if enabled) to verify the final page state
4. Adjust steps as needed and test again
## Common Workflows
### Login to a Website
```
Step 1: Click element
Selector: #login-button
Step 2: Enter text in field
Selector: input[name="username"]
Value: your-username
Step 3: Enter text in field
Selector: input[name="password"]
Value: your-password
Step 4: Click element
Selector: button[type="submit"]
Step 5: Wait for seconds
Value: 3
```
### Accept Cookie Notice
```
Step 1: Wait for seconds
Value: 2
Step 2: Click element if exists
Selector: .cookie-accept-button
```
### Search and Monitor Results
```
Step 1: Enter text in field
Selector: input[name="search"]
Value: your search term
Step 2: Press Enter
Step 3: Wait for text
Value: Search results
Step 4: Click element containing text
Value: Filter
```
### Navigate Through Multi-Step Form
```
Step 1: Select by label
Selector: select[name="country"]
Value: United States
Step 2: Click element
Selector: button.next-step
Step 3: Wait for seconds
Value: 2
Step 4: Enter text in field
Selector: input#zipcode
Value: 12345
Step 5: Click element
Selector: button.show-results
```
## Best Practices
Websites need time to respond to interactions. Always add a small wait (1-2 seconds) after clicks or form submissions.
```
Step 1: Click element
Selector: .load-more-button
Step 2: Wait for seconds
Value: 2
```
Use unique IDs or specific classes to avoid clicking the wrong element.
**Good:** `#submit-button`, `button[data-test='login']`
**Bad:** `button`, `.btn` (too generic)
Use "if exists" variants for elements that might not always be present (like cookie notices).
```
Click element if exists
Selector: .cookie-banner button.accept
```
Enable screenshots in your watch settings to see the final page state after all steps execute.
Go to watch settings → Enable "Attach screenshot to notification"
Break complex workflows into clear, ordered steps. If something fails, it's easier to debug.
## Finding Selectors
### Using Browser DevTools
Right-click on the element → Select **Inspect** (or press F12)
The DevTools will highlight the HTML element
Right-click on the element in DevTools → Copy → Copy selector (CSS) or Copy XPath
Paste the selector into the Browser Steps field and test
### Selector Tips
**Prefer IDs over classes**
IDs are unique and more stable:
* `#username` ✅
* `.form-input` ❌ (might match multiple elements)
If no ID exists, use specific attributes:
* `input[name="email"]`
* `button[data-testid="submit"]`
## Troubleshooting
### Step Fails: Element Not Found
**Causes:**
* Element hasn't loaded yet
* Selector is incorrect
* Page structure changed
**Solutions:**
* Add a "Wait for seconds" step before the failing step
* Use "Wait for text" to ensure content has loaded
* Verify the selector using browser DevTools
* Use "if exists" variant if element is optional
### Login Doesn't Work
**Common issues:**
* Missing wait time after submitting credentials
* Website uses CAPTCHA or bot detection
* Incorrect selector for username/password fields
**Try:**
```
Step 1: Enter text in field (username)
Step 2: Enter text in field (password)
Step 3: Wait for seconds (Value: 1)
Step 4: Click element (submit button)
Step 5: Wait for seconds (Value: 5)
```
### Page Redirects Unexpectedly
**Solution:** Use "Wait for text" to ensure the target page has loaded:
```
Step 1: Click element (navigation link)
Step 2: Wait for text
Value: Expected text on target page
```
### JavaScript Not Executing
**Verify:**
* JavaScript is valid syntax
* You're using "Execute JS" action
* The script returns a value or modifies the page
**Example:**
```javascript theme={null}
document.querySelector('.hidden-content').style.display = 'block';
```
## Advanced Techniques
### Using Jinja2 Variables
Browser Steps support Jinja2 templating for dynamic values:
```
Enter text in field
Selector: input[name="date"]
Value: {{ now().strftime('%Y-%m-%d') }}
```
This enters today's date automatically.
### Combining with Visual Selector
**Recommended Workflow**
1. Use **Browser Steps** to navigate and interact with the page
2. Use **Visual Selector** to choose what content to monitor
3. Use **Filters** to refine change detection
Example:
```
1. Browser Steps: Log in and navigate to dashboard
2. Visual Selector: Select the "Account Balance" element
3. Filter: Trigger only when balance increases
```
### Executing Complex JavaScript
For advanced scenarios, use "Execute JS" to run custom code:
```javascript theme={null}
// Click all "Load more" buttons
document.querySelectorAll('.load-more').forEach(btn => btn.click());
// Scroll to bottom of infinite scroll
window.scrollTo(0, document.body.scrollHeight);
// Fill complex forms
document.querySelector('input[name="token"]').value = 'abc123';
```
## Security Considerations
**Storing Credentials**
Browser Steps are stored in plain text. Be cautious when entering passwords:
* Use a dedicated monitoring account with limited permissions
* Don't use your personal credentials
* Consider using environment variables or external credential management
* Regularly rotate passwords for monitoring accounts
## Related Features
Select specific page elements after Browser Steps complete
Refine what content triggers change notifications
## Next Steps
Set up a simple login or cookie acceptance flow
Use both features together for powerful monitoring
Configure alerts when monitored content changes
This documentation is built and hosted on [Mintlify](https://mintlify.com), a developer documentation platform.